Introduction to Flushing DNS
DNS (Domain Name System) is responsible for translating domain names into IP addresses, allowing computers to locate websites and services on the internet. Sometimes, DNS-related issues can occur, causing problems with internet connectivity or website access. One common troubleshooting step is to flush the DNS cache, which clears the stored DNS information and forces the computer to retrieve fresh data. In this article, we will explore how to flush the DNS cache using the Windows ipconfig/flushdns command, providing you with a step-by-step guide to resolve DNS-related issues.
Understanding DNS Cache
What is DNS Cache?
DNS cache is a temporary storage on your computer that contains recently accessed DNS information. When you visit a website, your computer stores the corresponding DNS information in the cache to improve future access. This cache helps reduce the time required to resolve domain names into IP addresses.
When to Flush DNS Cache?
There are several situations where flushing the DNS cache can be beneficial:
- DNS-related Issues: If you’re experiencing DNS-related problems, such as slow website loading, incorrect website resolution, or difficulty accessing certain websites, flushing the DNS cache can help resolve these issues.
- Website Updates: If a website has recently made changes to its DNS records, your computer may still be holding the old DNS information. Flushing the DNS cache ensures that your computer retrieves the updated DNS data.
Flushing DNS Cache using ipconfig/flushdns
Step 1: Open the Command Prompt
To begin the process of flushing the DNS cache, you need to open the Command Prompt. Follow these steps:
- Press the Windows key on your keyboard or click the Windows Start button.
- Type “cmd” in the search bar.
- Click on the “Command Prompt” application to open it.
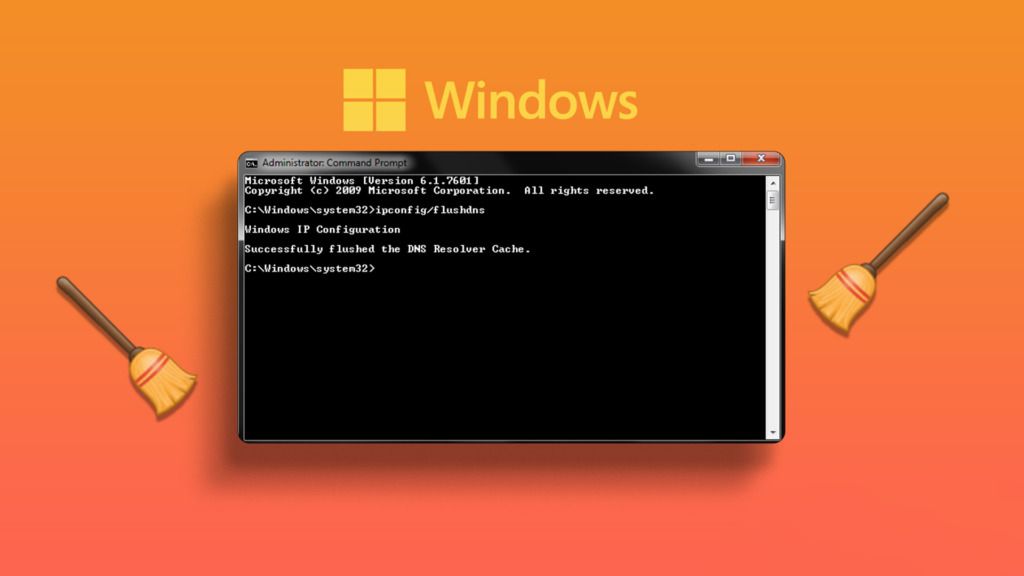
Step 2: Run the ipconfig/flushdns Command
Once the Command Prompt is open, you can execute the ipconfig/flushdns command to flush the DNS cache. Follow these steps:
- In the Command Prompt window, type the following command:
ipconfig /flushdns
- Press Enter to run the command.
Step 3: Verify the DNS Cache Flush
After running the ipconfig/flushdns command, you can verify if the DNS cache has been successfully flushed. Follow these steps:
- In the Command Prompt window, type the following command:
ipconfig /displaydns
2. Press Enter to view the DNS cache.If the DNS cache has been successfully flushed, you should see a message indicating that the DNS resolver cache has been cleared.
Step 4: Restart Network Services (Optional)
In some cases, restarting network-related services can further ensure that the DNS cache is completely cleared. Follow these steps:
- In the Command Prompt window, type the following command:
netsh winsock reset
- Press Enter to execute the command.This command resets the Winsock catalog to its default state.
- Restart your computer to apply the changes.

Additional Tips and Considerations
Flushing DNS Cache on Different Windows Versions
The ipconfig/flushdns command works on most Windows versions, including Windows 10, Windows 8, and Windows 7. However, the command may vary slightly for different versions. It’s recommended to consult the official documentation or Microsoft support for the specific command syntax for your Windows

Hi all, my name is Angelika and I am one of the authors of the EasyTechh website. Like the rest of our team I am incredibly ambitious and I love helping people.
That’s why I write here and not only here 😉 I write interesting and useful for people articles in the IT sphere and a little bit about life.
Enjoy reading.


+ There are no comments
Add yours